Recommended environment setup tutorial
This section guides first-time contributors through installing the Zulip development environment on Windows, macOS, and Linux.
The recommended method for installing the Zulip development environment is to use WSL 2 on Windows, and Vagrant with Docker on macOS and Linux.
All of these recommended methods work by creating a container or VM for the Zulip server and related services, with the Git repository containing your source code mounted inside it. This strategy allows the environment to be as reliable and portable as possible. The specific technologies (Vagrant/Docker and WSL 2) were chosen based on what technologies have been most reliable through our experience supporting the thousands of people who’ve set up the Zulip development environment.
Contents:
Requirements
Installing the Zulip development environment requires downloading several hundred megabytes of dependencies. You will need an active internet connection throughout the entire installation processes. (See Specifying a proxy if you need a proxy to access the internet.)
2GB available RAM
active broadband internet connection
Windows 64-bit (Windows 10 recommended)
hardware virtualization enabled (VT-x or AMD-V)
administrator access
macOS (10.11 El Capitan or newer recommended)
Ubuntu 22.04, 24.04, or 26.04
Debian 12 or 13
tested for Fedora 36
Any Linux distribution should work, if it supports Git, Vagrant and Docker. We don’t maintain documentation for installing Vagrant, Docker, and other dependencies on those systems, so you’ll want to roughly follow the Ubuntu/Debian instructions, using upstream documentation for installing dependencies.
Step 0: Set up Git & GitHub
You can skip this step if you already have Git, GitHub, and SSH access to GitHub working on your machine.
Follow our Git guide in order to install Git, set up a GitHub account, create an SSH key to access code on GitHub efficiently, etc. Be sure to create an SSH key and add it to your GitHub account using these instructions.
Step 1: Install prerequisites
Zulip’s development environment is most easily set up on Windows using the Windows Subsystem for Linux (WSL 2) installation method described here. We require version 0.67.6+ of WSL 2.
Enable virtualization through your BIOS settings. This sequence depends on your specific hardware and brand, but here are some basic instructions.
Install WSL 2, which includes installing an Ubuntu WSL distribution.
Create a new WSL instance for Zulip development. You can refer this article for instructions on how to do so. Using an existing instance will probably work, but a fresh distribution is recommended if you previously installed other software like
nodein your WSL environment that might conflict with the Zulip environment.It is required to enable
systemdfor WSL 2 to manage the database, cache and other services. To configure it, please follow these instructions. Then, you will need to restart WSL 2 before continuing.Launch the Ubuntu shell as an administrator and run the following command:
$ sudo apt update && sudo apt upgrade
Install dependencies with the following command:
$ sudo apt install rabbitmq-server memcached redis-server postgresql
Open
/etc/rabbitmq/rabbitmq-env.confusing, for example:$ sudo nano /etc/rabbitmq/rabbitmq-env.conf
Confirm the following lines are at the end of your file, and add them if not present:
NODE_IP_ADDRESS=127.0.0.1
NODE_PORT=5672
Then save your changes (
Ctrl+O, thenEnterto confirm the path), and exitnano(Ctrl+X).Run the command below to make sure you are inside the WSL disk and not in a Windows mounted disk. You will run into permission issues if you run
./tools/provisionfromzulipin a Windows mounted disk.$ cd ~ # or cd /home/USERNAME
Create a new SSH key for the WSL 2 virtual machine and add it to your GitHub account. Note that SSH keys linked to your Windows computer will not work within the virtual machine.
WSL 2 can be uninstalled by following Microsoft’s documentation
Install Vagrant (latest).
Install Docker Desktop (latest).
Open the Docker desktop app’s settings panel, and uncheck “Use gRPC FUSE for file sharing” to use the
osxfs (legacy)file sharing instead.
1. Install Vagrant, Docker, and Git
Install vagrant:
$ wget -O - https://apt.releases.hashicorp.com/gpg | sudo gpg --dearmor -o /usr/share/keyrings/hashicorp-archive-keyring.gpg
$ echo "deb [arch=$(dpkg --print-architecture) signed-by=/usr/share/keyrings/hashicorp-archive-keyring.gpg] https://apt.releases.hashicorp.com $(lsb_release -cs) main" | sudo tee /etc/apt/sources.list.d/hashicorp.list
$ sudo apt update && sudo apt install vagrant
Install Docker and Git:
$ sudo apt install docker.io git
2. Create the docker group and add yourself to it:
$ sudo groupadd docker
$ sudo usermod -aG docker $USER
You will need to log out and log back in (or reboot) for this change to take effect.
If it worked, you will see docker in your list of groups:
$ groups | grep docker
YOURUSERNAME adm cdrom sudo dip plugdev lpadmin sambashare docker
3. Make sure the Docker daemon is running
Docker runs as a background service (daemon), which must be running for Docker commands to work.
If you had previously installed and removed an older version of Docker, an Ubuntu bug may prevent Docker from being automatically enabled and started after installation. You can check using the following:
$ systemctl status docker
● docker.service - Docker Application Container Engine
   Loaded: loaded (/lib/systemd/system/docker.service; enabled; vendor preset: enabled)
   Active: active (running) since Mon 2019-07-15 23:20:46 IST; 18min ago
If the service is not running, you’ll see Active: inactive (dead) on
the second line, and will need to enable and start the Docker service
using the following:
$ sudo systemctl unmask docker
$ sudo systemctl enable docker
$ sudo systemctl start docker
1. Install Vagrant, Docker, and Git
$ sudo yum install vagrant git moby-engine
Fedora does not include the
official docker-ce package in their repositories. They provide the package
moby-engine which you can choose instead. In case you prefer the official
docker distribution, you can follow
their documentation to install Docker on Fedora.
2. Create the docker group and add yourself to it:
$ sudo groupadd docker
$ sudo usermod -aG docker $USER
You will need to log out and log back in (or reboot) for this change to take effect.
If it worked, you will see docker in your list of groups:
$ groups | grep docker
YOURUSERNAME adm cdrom sudo dip plugdev lpadmin sambashare docker
3. Make sure the Docker daemon is running
Docker runs as a background service (daemon), which must be running for Docker commands to work.
If you had previously installed and removed an older version of Docker, an Ubuntu bug may prevent Docker from being automatically enabled and started after installation. You can check using the following:
$ systemctl status docker
● docker.service - Docker Application Container Engine
   Loaded: loaded (/lib/systemd/system/docker.service; enabled; vendor preset: enabled)
   Active: active (running) since Mon 2019-07-15 23:20:46 IST; 18min ago
If the service is not running, you’ll see Active: inactive (dead) on
the second line, and will need to enable and start the Docker service
using the following:
$ sudo systemctl unmask docker
$ sudo systemctl enable docker
$ sudo systemctl start docker
Step 2: Get Zulip code
In your browser, visit https://github.com/zulip/zulip and click the Fork button. You will need to be logged in to GitHub to do this.
Open Terminal (macOS/Linux) or Git BASH (Windows; must run as an Administrator).
In Terminal/Git BASH, clone your fork of the Zulip repository and connect the Zulip upstream repository:
$ git clone --config pull.rebase git@github.com:YOURUSERNAME/zulip.git
$ cd zulip
$ git remote add -f upstream https://github.com/zulip/zulip.git
This will create a zulip directory and download the Zulip code into it.
Don’t forget to replace YOURUSERNAME with your Git username. You will see
something like:
$ git clone --config pull.rebase git@github.com:YOURUSERNAME/zulip.git
Cloning into 'zulip'...
remote: Counting objects: 73571, done.
remote: Compressing objects: 100% (2/2), done.
remote: Total 73571 (delta 1), reused 0 (delta 0), pack-reused 73569
Receiving objects: 100% (73571/73571), 105.30 MiB | 6.46 MiB/s, done.
Resolving deltas: 100% (51448/51448), done.
Checking connectivity... done.
Checking out files: 100% (1912/1912), done.
Step 3: Start the development environment
Run the following to install the Zulip development environment and start it. (If Windows Firewall creates popups to block services, simply click Allow access.)
$ # Install/update the Zulip development environment
$ ./tools/provision
$ # Enter the Zulip Python environment
$ source .venv/bin/activate
$ # Start the development server
$ ./tools/run-dev
If you are facing problems or you see error messages after running ./tools/run-dev,
you can try running ./tools/provision again.
Change into the zulip directory and tell Vagrant to start the Zulip
development environment with vagrant up:
$ cd zulip
$ vagrant plugin install vagrant-vbguest
$ vagrant up --provider=virtualbox
The first time you run this command it will take some time because Vagrant does the following:
downloads the base Ubuntu 22.04 virtual machine/Docker image
configures this virtual machine/container for use with Zulip,
creates a shared directory mapping your clone of the Zulip code inside the virtual machine/container at
~/zulipruns the
./tools/provisionscript inside the virtual machine/container, which downloads all required dependencies, sets up the Python environment for the Zulip development server, and initializes a default test database. We call this process “provisioning”, and it is documented in some detail in our dependencies documentation.
You will need an active internet connection during the entire
process. (See Specifying a proxy if you need a
proxy to access the internet.) vagrant up can fail while
provisioning if your Internet connection is unreliable. To retry, you
can use vagrant provision (vagrant up will just boot the guest
without provisioning after the first time). Other common issues are
documented in the
Troubleshooting and common errors
section. If that doesn’t help, please visit
#provision help
in the Zulip development community server for
real-time help.
On Windows, you will see the message
The system cannot find the path specified. several times. This is
normal and is not a problem.
Once vagrant up has completed, connect to the development environment
with vagrant ssh:
$ vagrant ssh
You should see output that starts like this:
Welcome to Ubuntu 22.04.3 LTS (GNU/Linux 5.15.0-92-generic x86_64)
Congrats, you’re now inside the Zulip development environment!
You can confirm this by looking at the command prompt, which starts
with (zulip-server) vagrant@. If it just starts with vagrant@, your
provisioning failed and you should look at the
troubleshooting section.
Next, start the Zulip server:
(zulip-server) vagrant@vagrant:/srv/zulip$ ./tools/run-dev
You will see something like:
Starting Zulip on:

        http://localhost:9991/

Internal ports:
   9991: Development server proxy (connect here)
   9992: Django
   9993: Tornado
   9994: webpack

Tornado server (re)started on port 9993

2023-12-15 20:57:14.206 INFO [process_queue] 13 queue worker threads were launched
frontend:
  frontend (webpack 5.89.0) compiled successfully in 8054 ms
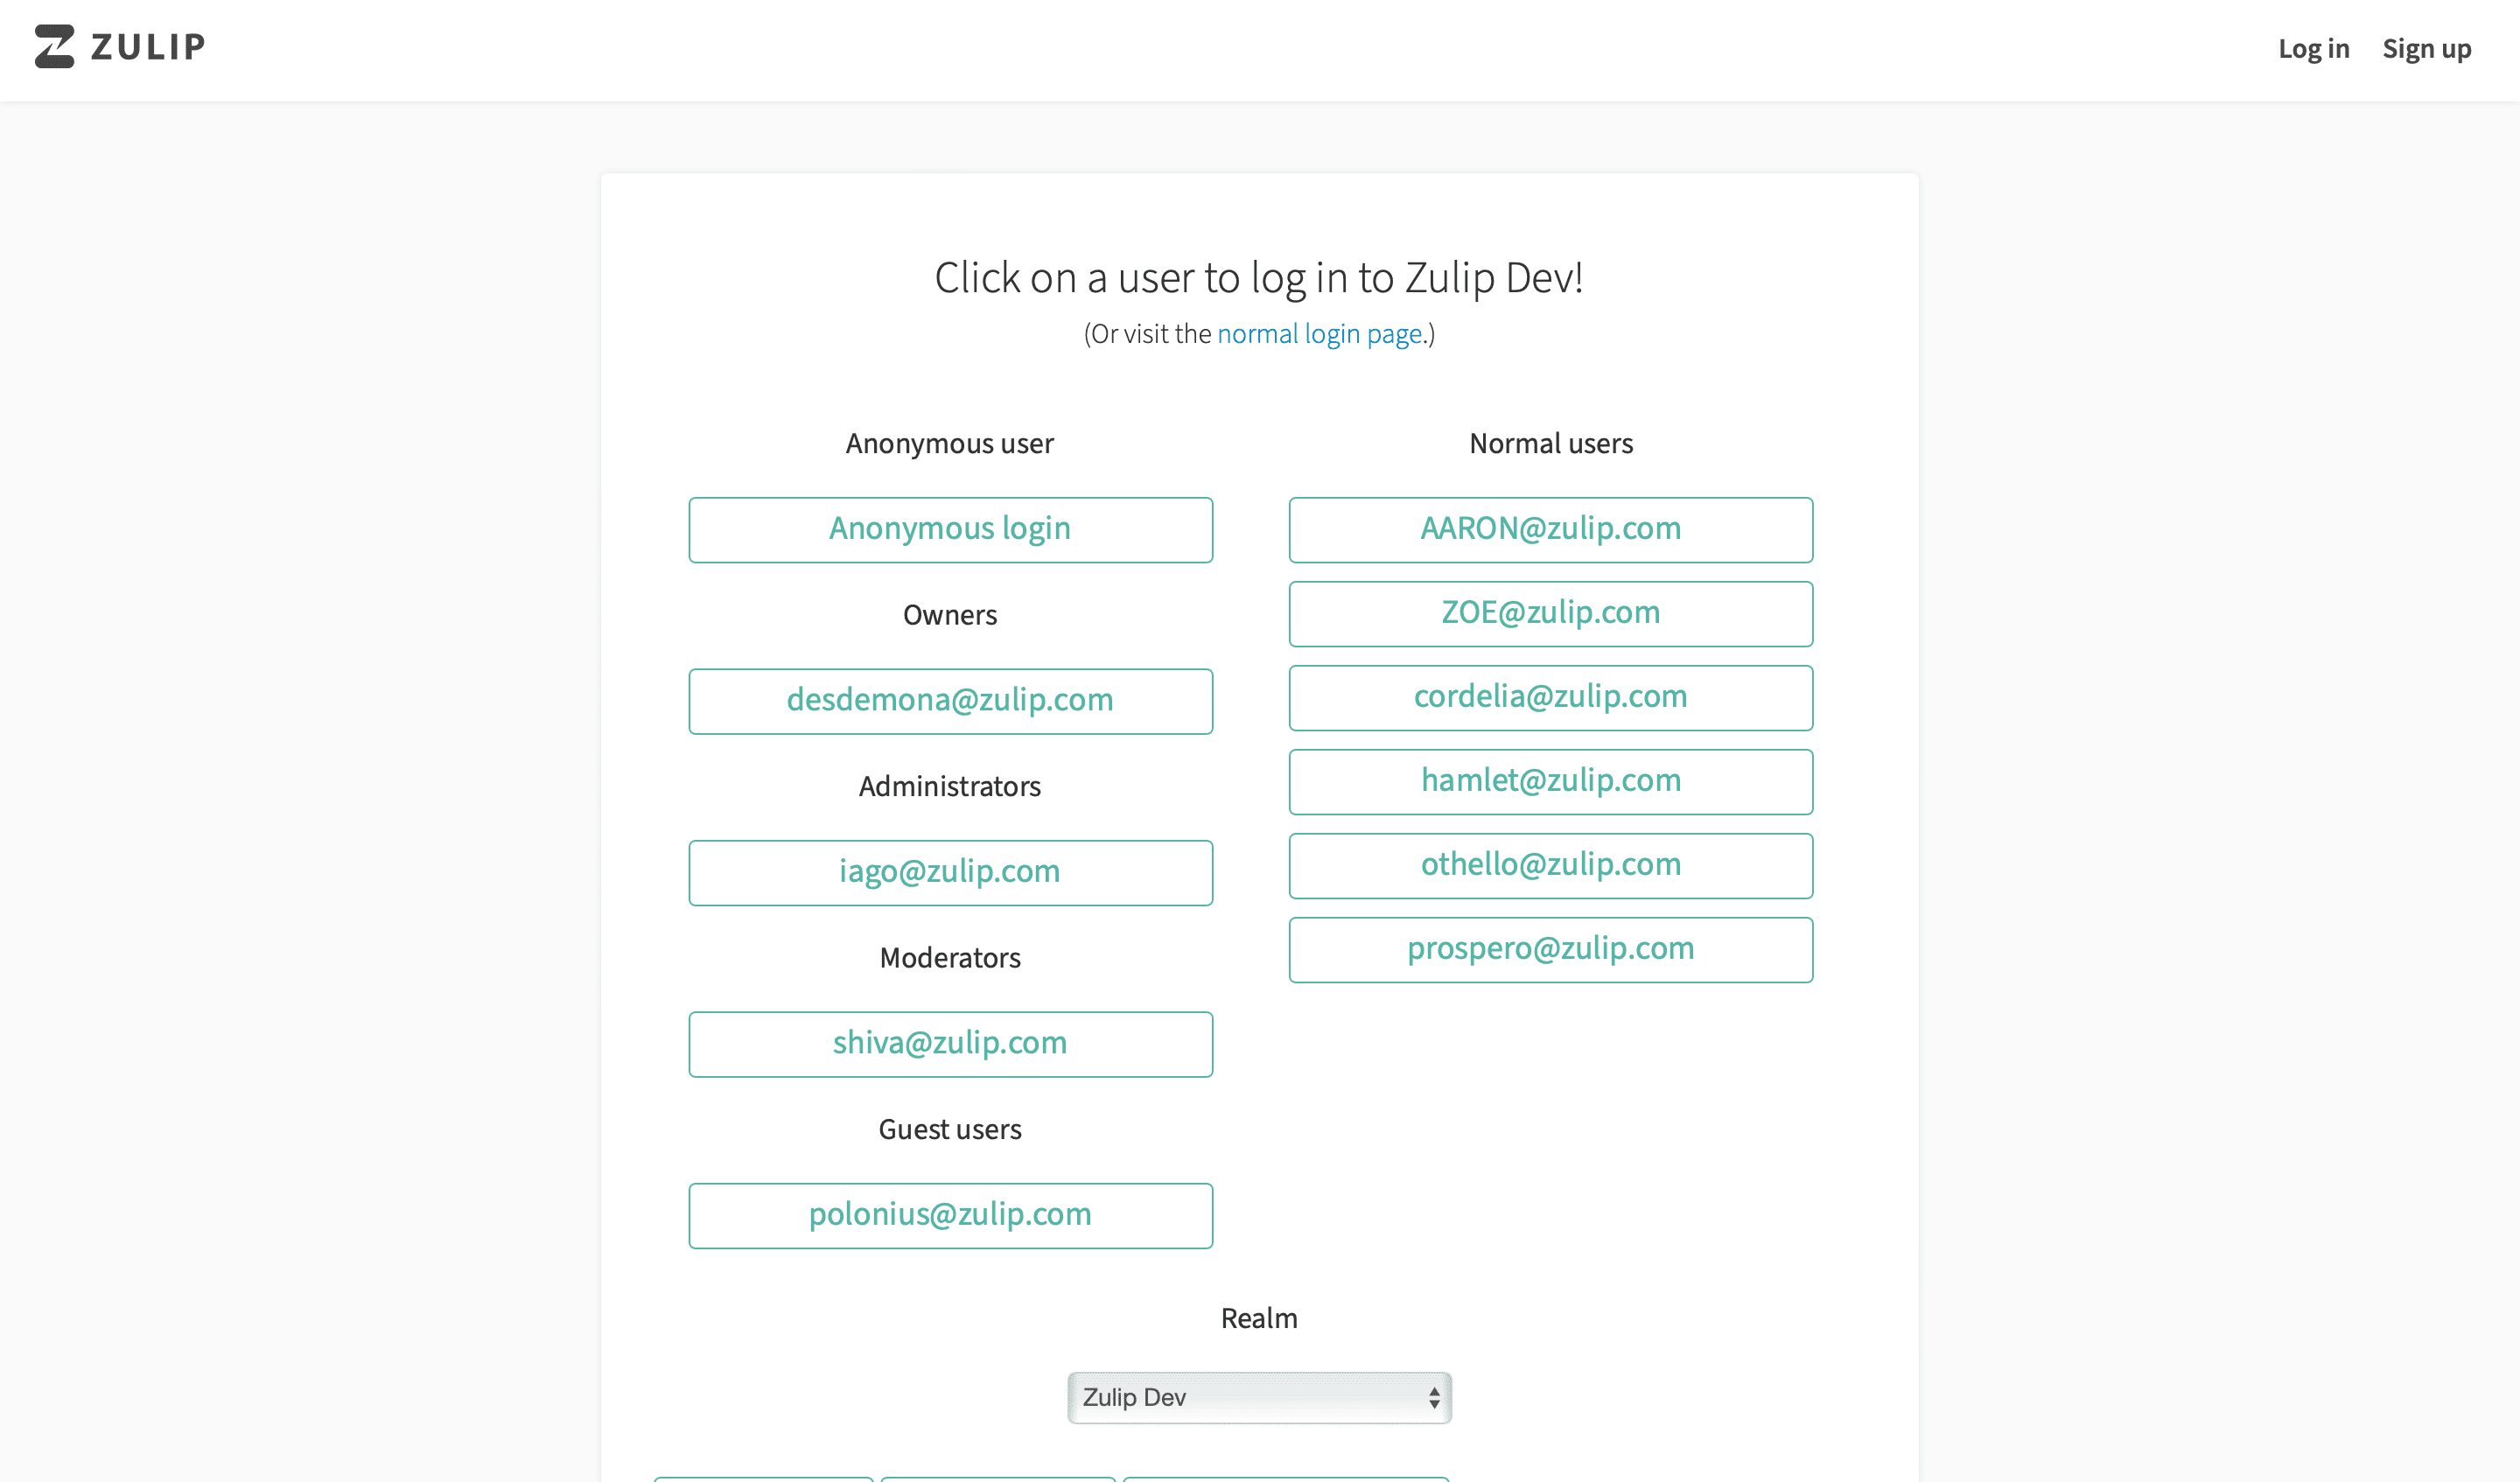
Now the Zulip server should be running and accessible. Verify this by navigating to http://localhost:9991/devlogin in the browser on your main machine.
You should see something like this:
The Zulip server will continue to run and send output to the terminal window. When you navigate to Zulip in your browser, check your terminal and you should see something like:
2016-05-04 18:21:57,547 INFO     127.0.0.1       GET     302 582ms (+start: 417ms) / (unauth@zulip via ?)
[04/May/2016 18:21:57]"GET / HTTP/1.0" 302 0
2016-05-04 18:21:57,568 INFO     127.0.0.1       GET     301   4ms /login (unauth@zulip via ?)
[04/May/2016 18:21:57]"GET /login HTTP/1.0" 301 0
2016-05-04 18:21:57,819 INFO     127.0.0.1       GET     200 209ms (db: 7ms/2q) /login/ (unauth@zulip via ?)
Change into the zulip directory and tell Vagrant to start the Zulip
development environment with vagrant up:
$ cd zulip
$ vagrant up --provider=docker
Important note: There is a known upstream issue on
macOS
that can cause provisioning to fail with ERR_PNPM_LINKING_FAILED or
other errors. The temporary fix is to open the Docker desktop app’s
settings panel, and choose osxfs (legacy) under “Choose file sharing
implementation for your containers.” Once Docker restarts, you should
be able to successfully run vagrant up --provider=docker. Back in
Docker, you should return to using VirtioFS so that your files sync
properly while developing, but you may need to revert to osxfs (legacy)
whenever you need to re-provision.
The first time you run this command it will take some time because Vagrant does the following:
downloads the base Ubuntu 22.04 virtual machine/Docker image
configures this virtual machine/container for use with Zulip,
creates a shared directory mapping your clone of the Zulip code inside the virtual machine/container at
~/zulipruns the
./tools/provisionscript inside the virtual machine/container, which downloads all required dependencies, sets up the Python environment for the Zulip development server, and initializes a default test database. We call this process “provisioning”, and it is documented in some detail in our dependencies documentation.
You will need an active internet connection during the entire
process. (See Specifying a proxy if you need a
proxy to access the internet.) vagrant up can fail while
provisioning if your Internet connection is unreliable. To retry, you
can use vagrant provision (vagrant up will just boot the guest
without provisioning after the first time). Other common issues are
documented in the
Troubleshooting and common errors
section. If that doesn’t help, please visit
#provision help
in the Zulip development community server for
real-time help.
Once vagrant up has completed, connect to the development environment
with vagrant ssh:
$ vagrant ssh
You should see output that starts like this:
Welcome to Ubuntu 22.04.3 LTS (GNU/Linux 5.15.0-92-generic x86_64)
Congrats, you’re now inside the Zulip development environment!
You can confirm this by looking at the command prompt, which starts
with (zulip-server) vagrant@. If it just starts with vagrant@, your
provisioning failed and you should look at the
troubleshooting section.
Next, start the Zulip server:
(zulip-server) vagrant@vagrant:/srv/zulip$ ./tools/run-dev
You will see something like:
Starting Zulip on:

        http://localhost:9991/

Internal ports:
   9991: Development server proxy (connect here)
   9992: Django
   9993: Tornado
   9994: webpack

Tornado server (re)started on port 9993

2023-12-15 20:57:14.206 INFO [process_queue] 13 queue worker threads were launched
frontend:
  frontend (webpack 5.89.0) compiled successfully in 8054 ms
Now the Zulip server should be running and accessible. Verify this by navigating to http://localhost:9991/devlogin in the browser on your main machine.
You should see something like this:
The Zulip server will continue to run and send output to the terminal window. When you navigate to Zulip in your browser, check your terminal and you should see something like:
2016-05-04 18:21:57,547 INFO     127.0.0.1       GET     302 582ms (+start: 417ms) / (unauth@zulip via ?)
[04/May/2016 18:21:57]"GET / HTTP/1.0" 302 0
2016-05-04 18:21:57,568 INFO     127.0.0.1       GET     301   4ms /login (unauth@zulip via ?)
[04/May/2016 18:21:57]"GET /login HTTP/1.0" 301 0
2016-05-04 18:21:57,819 INFO     127.0.0.1       GET     200 209ms (db: 7ms/2q) /login/ (unauth@zulip via ?)
Change into the zulip directory and tell Vagrant to start the Zulip
development environment with vagrant up:
$ cd zulip
$ vagrant up --provider=docker
The first time you run this command it will take some time because Vagrant does the following:
downloads the base Ubuntu 22.04 virtual machine/Docker image
configures this virtual machine/container for use with Zulip,
creates a shared directory mapping your clone of the Zulip code inside the virtual machine/container at
~/zulipruns the
./tools/provisionscript inside the virtual machine/container, which downloads all required dependencies, sets up the Python environment for the Zulip development server, and initializes a default test database. We call this process “provisioning”, and it is documented in some detail in our dependencies documentation.
You will need an active internet connection during the entire
process. (See Specifying a proxy if you need a
proxy to access the internet.) vagrant up can fail while
provisioning if your Internet connection is unreliable. To retry, you
can use vagrant provision (vagrant up will just boot the guest
without provisioning after the first time). Other common issues are
documented in the
Troubleshooting and common errors
section. If that doesn’t help, please visit
#provision help
in the Zulip development community server for
real-time help.
Once vagrant up has completed, connect to the development environment
with vagrant ssh:
$ vagrant ssh
You should see output that starts like this:
Welcome to Ubuntu 22.04.3 LTS (GNU/Linux 5.15.0-92-generic x86_64)
Congrats, you’re now inside the Zulip development environment!
You can confirm this by looking at the command prompt, which starts
with (zulip-server) vagrant@. If it just starts with vagrant@, your
provisioning failed and you should look at the
troubleshooting section.
Next, start the Zulip server:
(zulip-server) vagrant@vagrant:/srv/zulip$ ./tools/run-dev
You will see something like:
Starting Zulip on:

        http://localhost:9991/

Internal ports:
   9991: Development server proxy (connect here)
   9992: Django
   9993: Tornado
   9994: webpack

Tornado server (re)started on port 9993

2023-12-15 20:57:14.206 INFO [process_queue] 13 queue worker threads were launched
frontend:
  frontend (webpack 5.89.0) compiled successfully in 8054 ms
Now the Zulip server should be running and accessible. Verify this by navigating to http://localhost:9991/devlogin in the browser on your main machine.
You should see something like this:
The Zulip server will continue to run and send output to the terminal window. When you navigate to Zulip in your browser, check your terminal and you should see something like:
2016-05-04 18:21:57,547 INFO     127.0.0.1       GET     302 582ms (+start: 417ms) / (unauth@zulip via ?)
[04/May/2016 18:21:57]"GET / HTTP/1.0" 302 0
2016-05-04 18:21:57,568 INFO     127.0.0.1       GET     301   4ms /login (unauth@zulip via ?)
[04/May/2016 18:21:57]"GET /login HTTP/1.0" 301 0
2016-05-04 18:21:57,819 INFO     127.0.0.1       GET     200 209ms (db: 7ms/2q) /login/ (unauth@zulip via ?)
Step 4: Developing
Where to edit files
You’ll work by editing files on your host machine, in the directory where you cloned Zulip. Use your favorite editor (Sublime, Atom, Vim, Emacs, Notepad++, etc.).
When you save changes they will be synced automatically to the Zulip development environment on the virtual machine/container.
Each component of the Zulip development server will automatically restart itself or reload data appropriately when you make changes. So, to see your changes, all you usually have to do is reload your browser. More details on how this works are available below.
Zulip’s whitespace rules are all enforced by linters, so be sure to
run tools/lint often to make sure you’re following our coding style
(or use tools/setup-git-repo to run it on just the changed files
automatically whenever you commit).
VSCode setup (optional)
The Visual Studio Code Remote - WSL extension is recommended for editing files when developing with WSL. When you have it installed, you can run:
$ code .
to open VS Code connected to your WSL environment. See the Remote development in WSL tutorial for more information.
If your preferred editor is Visual Studio Code, the Visual Studio Code Remote - SSH extension is recommended for editing files when developing with Vagrant. When you have it installed, you can run:
$ code .
to open VS Code connected to your Vagrant environment. See the Remote development over SSH tutorial for more information.
When using this plugin with Vagrant, you will want to run the command
vagrant ssh-config from your zulip folder:
$ vagrant ssh-config
Host default
  HostName 127.0.0.1
  User vagrant
  Port 2222
  UserKnownHostsFile /dev/null
  StrictHostKeyChecking no
  PasswordAuthentication no
  IdentityFile /PATH/TO/zulip/.vagrant/machines/default/docker/private_key
  IdentitiesOnly yes
  LogLevel FATAL
  PubkeyAcceptedKeyTypes +ssh-rsa
  HostKeyAlgorithms +ssh-rsa
Then copy that config into your ~/.ssh/config file. You may want to change
the host name from default to something more descriptive, like zulip.
Finally, refresh the known remotes in Visual Studio Code’s Remote Explorer.
Understanding run-dev debugging output
It’s good to have the terminal running ./tools/run-dev up as you work since error
messages including tracebacks along with every backend request will be printed
there.
See Logging for further details on the run-dev console output.
Committing and pushing changes with Git
When you’re ready to commit or push changes via Git, you will do this by running Git commands in Terminal (macOS/Linux) or Git BASH (Windows) in the directory where you cloned Zulip on your main machine.
If you’re new to working with Git/GitHub, check out our Git & GitHub guide.
Maintaining the development environment
If after rebasing onto a new version of the Zulip server, you receive
new errors while starting the Zulip server or running tests, this is
probably not because Zulip’s main branch is broken. Instead, this
is likely because we’ve recently merged changes to the development
environment provisioning process that you need to apply to your
development environment. To update your environment, you’ll need to
re-provision using tools/provision from your Zulip checkout; this
should complete in about a minute.
After provisioning, you’ll want to (re)start the Zulip development server.
If you run into any trouble, #provision help in the Zulip development community server is a great place to ask for help.
If after rebasing onto a new version of the Zulip server, you receive
new errors while starting the Zulip server or running tests, this is
probably not because Zulip’s main branch is broken. Instead, this
is likely because we’ve recently merged changes to the development
environment provisioning process that you need to apply to your
development environment. To update your environment, you’ll need to
re-provision your Vagrant machine using vagrant provision (this just
runs tools/provision from your Zulip checkout inside the Vagrant
guest); this should complete in about a minute.
After provisioning, you’ll want to (re)start the Zulip development server.
If you run into any trouble, #provision help in the Zulip development community server is a great place to ask for help.
Rebuilding the development environment
If you ever want to recreate your development environment again from scratch (e.g., to test a change you’ve made to the provisioning process, or because you think something is broken), you can do so using the following steps:
To find the distribution name to unregister (delete), open Command Prompt or PowerShell and use the following command:
$ wsl --list --verbose
If you are unsure about which distribution to unregister, you can log into the WSL distributions to ensure you are deleting the one containing your development environment using the command:
wsl -d <Distribution Name>
To uninstall your WSL distribution, enter the command:
$ wsl --unregister <Distribution Name>
For more information, checkout the official documentation for WSL commands
Next, follow the setup instructions, starting from [Step 1: Install prerequisites]
If you just want to rebuild the development database, the following is much faster:
$ ./tools/rebuild-dev-database
For more details, see the schema migration documentation.
If you ever want to recreate your development environment again from
scratch (e.g., to test a change you’ve made to the provisioning
process, or because you think something is broken), you can do so
using vagrant destroy and then vagrant up. This will usually be
much faster than the original vagrant up since the base image is
already cached on your machine (it takes about 5 minutes to run with a
fast Internet connection).
Any additional programs (e.g., Zsh, emacs, etc.) or configuration that
you may have installed in the development environment will be lost
when you recreate it. To address this, you can create a script called
tools/custom_provision in your Zulip Git checkout; and place any
extra setup commands there. Vagrant will run tools/custom_provision
every time you run vagrant provision (or create a Vagrant guest via
vagrant up).
Shutting down the development environment for use later
On Windows with WSL 2, you do not need to shut down the environment. Simply close your terminal window(s).
Alternatively, you can use a command to terminate/shutdown your WSL2 environment with PowerShell using:
> wsl --terminate <environment_name>
To shut down but preserve the development environment so you can use
it again later use vagrant halt or vagrant suspend.
You can do this from the same Terminal/Git BASH window that is running
run-dev by pressing ^C to halt the server and then typing exit. Or you
can halt Vagrant from another Terminal/Git BASH window.
From the window where run-dev is running:
2016-05-04 18:33:13,330 INFO     127.0.0.1       GET     200  92ms /register/ (unauth@zulip via ?)
^C
KeyboardInterrupt
(zulip-server) vagrant@vagrant:/srv/zulip$ exit
logout
Connection to 127.0.0.1 closed.
$
Now you can suspend the development environment:
$ vagrant suspend
==> default: Saving VM state and suspending execution...
If vagrant suspend doesn’t work, try vagrant halt:
$ vagrant halt
==> default: Attempting graceful shutdown of VM...
Check out the Vagrant documentation to learn more about suspend and halt.
Resuming the development environment
On Windows with WSL 2, to resume developing you just need to open a new Git
BASH window. Then change into your zulip folder and verify the Python
environment was properly activated (you should see (zulip-server)). If the
(zulip-server) part is missing, run:
$ source .venv/bin/activate
When you’re ready to work on Zulip again, run vagrant up (no need to
pass the --provider option required above). You will also need to
connect to the virtual machine with vagrant ssh and re-start the
Zulip server:
$ vagrant up
$ vagrant ssh

(zulip-server) vagrant@vagrant:/srv/zulip$ ./tools/run-dev
Next steps
Next, read the following to learn more about developing for Zulip:
Testing (and Configuring CI to run the full test suite against any branches you push to your fork, which can help you optimize your development workflow).
Troubleshooting and common errors
Below you’ll find a list of common errors and their solutions. Most
issues are resolved by just provisioning again by running
./tools/provision (from /srv/zulip) inside the Vagrant guest (or
equivalently vagrant provision from outside) or by running
./tools/provision in ~/zulip inside the WSL instance.
If these solutions aren’t working for you or you encounter an issue not documented below, there are a few ways to get further help:
Ask in #provision help in the Zulip development community server.
When reporting your issue, please include the following information:
The host operating system
The installation method (e.g., Vagrant or WSL)
Whether or not you are using a proxy
A copy of Zulip’s
vagrantprovisioning logs, available in/var/log/provision.logon your virtual machine or~/zulip/var/log/provision.logon your WSL instance. If you choose to post just the error output, please include the beginning of the error output, not just the last few lines.
The output of tools/diagnose (run inside the Vagrant guest or
WSL instance) is also usually helpful.
WSL2 users often encounter issues where services fail to start or remain inactive. Follow the steps below to diagnose and resolve such problems.
1. Check the Status of the Service
To verify if a service is running, use the following command:
$ systemctl status <service_name>
If the service is inactive, you can attempt to start it with:
$ systemctl start <service_name>
2. Diagnose Port Conflicts
Services like postgresql may fail to start due to port conflicts. These conflicts can be caused by:
Other services running in Windows.
Services running in another WSL2 instance.
Resolving Port Conflicts with Other WSL Instances
To resolve port conflicts with another WSL2 instance, stop the conflicting instance using the following command:
> wsl -t <WSL_Instance_Name>
After stopping the conflicting instance, restart your WSL instance with:
> wsl -d <Your_Zulip_Instance_Name>
Resolving Port Conflicts with Services Running on Windows
To resolve conflicts caused by Windows processes:
Identify the process using the conflicting port by running:
> Get-Process -Id (Get-NetTCPConnection -LocalPort <your_port_number>).OwningProcess
If a process is found, terminate it using:
> taskkill /PID <pid> /F
Restart the Service or Enable Auto-Start
After resolving port conflicts, try restarting the service using:
$ systemctl start <service_name>
To ensure the service always starts on boot, enable it with:
$ systemctl enable <service_name>
Additional Tips
Use
wsl --listto view all running WSL2 instances and their states.Avoid overlapping port usage between WSL2 instances and Windows processes.
Keep a record of services and their associated port numbers to prevent conflicts in the future.
Ensure that you use a fresh WSL instance to setup the Zulip development environment to avoid dependency conflicts.
Vagrant guest doesn’t show (zulip-server) at start of prompt
This is caused by provisioning failing to complete successfully. You
can see the errors in var/log/provision.log; it should end with
something like this:
ESC[94mZulip development environment setup succeeded!ESC[0m
The ESC stuff are the terminal color codes that make it show as a nice
blue in the terminal, which unfortunately looks ugly in the logs.
If you encounter an incomplete /var/log/provision.log file, you need to
update your environment. Re-provision your Vagrant machine; if the problem
persists, please come chat with us (see instructions above) for help.
After you provision successfully, you’ll need to exit your vagrant ssh
shell and run vagrant ssh again to get the virtualenv setup properly.
ssl read error
If you receive the following error while running vagrant up:
SSL read: error:00000000:lib(0):func(0):reason(0), errno 104
It means that either your network connection is unstable and/or very
slow. To resolve it, run vagrant up until it works (possibly on a
better network connection).
ssh connection closed by remote host
On running vagrant ssh, if you see the following error:
ssh_exchange_identification: Connection closed by remote host
It usually means the Vagrant guest is not running, which is usually
solved by rebooting the Vagrant guest via vagrant halt; vagrant up. See
Vagrant was unable to communicate with the guest machine
for more details.
Vagrant was unable to communicate with the guest machine
If you see the following error when you run vagrant up:
Timed out while waiting for the machine to boot. This means that
Vagrant was unable to communicate with the guest machine within
the configured ("config.vm.boot_timeout" value) time period.

If you look above, you should be able to see the error(s) that
Vagrant had when attempting to connect to the machine. These errors
are usually good hints as to what may be wrong.

If you're using a custom box, make sure that networking is properly
working and you're able to connect to the machine. It is a common
problem that networking isn't setup properly in these boxes.
Verify that authentication configurations are also setup properly,
as well.

If the box appears to be booting properly, you may want to increase
the timeout ("config.vm.boot_timeout") value.
This has a range of possible causes, that usually amount to a bug in
Virtualbox or Vagrant. If you see this error, you usually can fix it
by rebooting the guest via vagrant halt; vagrant up.
Vagrant up fails with subprocess.CalledProcessError
The vagrant up command basically does the following:
Downloads an Ubuntu image and starts it using a Vagrant provider.
Uses
vagrant sshto connect to that Ubuntu guest, and then runstools/provision, which has a lot of subcommands that are executed via Python’ssubprocessmodule. These errors mean that one of those subcommands failed.
To debug such errors, you can log in to the Vagrant guest machine by
running vagrant ssh, which should present you with a standard shell
prompt. You can debug interactively by using, for example,
cd zulip && ./tools/provision, and then running the individual
subcommands that failed. Once you’ve resolved the problem, you can
rerun tools/provision to proceed; the provisioning system is
designed to recover well from failures.
The Zulip provisioning system is generally highly reliable; the most common cause of issues here is a poor network connection (or one where you need a proxy to access the Internet and haven’t configured the development environment to use it).
Once you’ve provisioned successfully, you’ll get output like this:
Zulip development environment setup succeeded!
(zulip-server) vagrant@vagrant:/srv/zulip$
If the (zulip-server) part is missing, this is because your
installation failed the first time before the Zulip virtualenv was
created. You can fix this by just closing the shell and running
vagrant ssh again, or using source .venv/bin/activate.
Finally, if you encounter any issues that weren’t caused by your Internet connection, please report them! We try hard to keep Zulip development environment provisioning free of bugs.
pip install fails during vagrant up on Linux
Likely causes are:
Networking issues
Insufficient RAM. Check whether you’ve allotted at least two gigabytes of RAM, which is the minimum Zulip requires. If not, go to your VM settings and increase the RAM, then restart the VM.
For the following error:
Vagrant was unable to mount VirtualBox shared folders. This is usually
because the filesystem "vboxsf" is not available. This filesystem is
made available via the VirtualBox Guest Additions and kernel
module. Please verify that these guest additions are properly
installed in the guest. This is not a bug in Vagrant and is usually
caused by a faulty Vagrant box. For context, the command attempted
was:

 mount -t vboxsf -o uid=1000,gid=1000 keys /keys
If this error starts happening unexpectedly, then just run:
$ vagrant halt
$ vagrant up
to reboot the guest. After this, you can do vagrant provision and
vagrant ssh.
os.symlink error
If you receive the following error while running vagrant up:
==> default: Traceback (most recent call last):
==> default: File "./emoji_dump.py", line 75, in <module>
==> default:
==> default: os.symlink('unicode/{}.png'.format(code_point), 'out/{}.png'.format(name))
==> default: OSError
==> default: :
==> default: [Errno 71] Protocol error
Then Vagrant was not able to create a symbolic link.
First, if you are using Windows, make sure you have run Git BASH (or Cygwin) as an administrator. By default, only administrators can create symbolic links on Windows. Additionally UAC, a Windows feature intended to limit the impact of malware, can prevent even administrator accounts from creating symlinks. Turning off UAC will allow you to create symlinks. You can also try some of the solutions mentioned here.
If you ran Git BASH as administrator but you already had VirtualBox
running, you might still get this error because VirtualBox is not
running as administrator. In that case: close the Zulip VM with
vagrant halt; close any other VirtualBox VMs that may be running;
exit VirtualBox; and try again with vagrant up --provision from a
Git BASH running as administrator.
Second, VirtualBox does not enable symbolic links by default. Vagrant starting with version 1.6.0 enables symbolic links for VirtualBox shared folder.
You can check to see that this is enabled for your virtual machine with
vboxmanage command.
Get the name of your virtual machine by running vboxmanage list vms and
then print out the custom settings for this virtual machine with
vboxmanage getextradata YOURVMNAME enumerate:
$ vboxmanage list vms
"zulip_default_1462498139595_55484" {5a65199d-8afa-4265-b2f6-6b1f162f157d}

$ vboxmanage getextradata zulip_default_1462498139595_55484 enumerate
Key: VBoxInternal2/SharedFoldersEnableSymlinksCreate/srv_zulip, Value: 1
Key: supported, Value: false
If you see “command not found” when you try to run VBoxManage, you need to
add the VirtualBox directory to your path. On Windows this is mostly likely
C:\Program Files\Oracle\VirtualBox\.
If vboxmanage enumerate prints nothing, or shows a value of 0 for
VBoxInternal2/SharedFoldersEnableSymlinksCreate/srv_zulip, then enable
symbolic links by running this command in Terminal/Git BASH/Cygwin:
$ vboxmanage setextradata YOURVMNAME VBoxInternal2/SharedFoldersEnableSymlinksCreate/srv_zulip 1
The virtual machine needs to be shut down when you run this command.
Hyper-V error messages
If you get an error message on Windows about lack of Windows Home
support for Hyper-V when running vagrant up, the problem is that
Windows is incorrectly attempting to use Hyper-V rather than
Virtualbox as the virtualization provider. You can fix this by
explicitly passing the virtualbox provider to vagrant up:
$ vagrant up --provide=virtualbox
Connection timeout on vagrant up
If you see the following error after running vagrant up:
default: SSH address: 127.0.0.1:2222
default: SSH username: vagrant
default: SSH auth method: private key
default: Error: Connection timeout. Retrying...
default: Error: Connection timeout. Retrying...
default: Error: Connection timeout. Retrying...
A likely cause is that hardware virtualization is not enabled for your computer. This must be done via your computer’s BIOS settings. Look for a setting called VT-x (Intel) or (AMD-V).
If this is already enabled in your BIOS, double-check that you are running a 64-bit operating system.
For further information about troubleshooting Vagrant timeout errors see this post.
There was an error while executing `VBoxManage`, a CLI used by Vagrant
for controlling VirtualBox. The command and stderr is shown below.

Command: ["startvm", "8924a681-b4e4-4b7a-96f2-4cb11619f123", "--type", "headless"]

Stderr: VBoxManage.exe: error: (VERR_NEM_MISSING_KERNEL_API).
VBoxManage.exe: error: VT-x is not available (VERR_VMX_NO_VMX)
VBoxManage.exe: error: Details: code E_FAIL (0x80004005), component ConsoleWrap, interface IConsole
or
Stderr: VBoxManage.exe: error: Call to WHvSetupPartition failed: ERROR_SUCCESS (Last=0xc000000d/87) (VERR_NEM_VM_CREATE_FAILED)
VBoxManage.exe: error: Details: code E_FAIL (0x80004005), component ConsoleWrap, interface IConsole
First, ensure that hardware virtualization support (VT-x or AMD-V) is enabled in your BIOS.
If the error persists, you may have run into an incompatibility
between VirtualBox and Hyper-V on Windows. To disable Hyper-V, open
command prompt as administrator, run
bcdedit /set hypervisorlaunchtype off, and reboot. If you need to
enable it later, run bcdedit /deletevalue hypervisorlaunchtype, and
reboot.
OSError: [Errno 26] Text file busy
default: Traceback (most recent call last):
…
default:   File "/srv/zulip-py3-venv/lib/python3.6/shutil.py", line 426, in _rmtree_safe_fd
default:     os.rmdir(name, dir_fd=topfd)
default: OSError: [Errno 26] Text file busy: 'baremetrics'
This error is caused by a bug in recent versions of the VirtualBox Guest Additions for Linux on Windows hosts. You can check the running version of VirtualBox Guest Additions with this command:
$ vagrant ssh -- 'sudo modinfo -F version vboxsf'
The bug has not been fixed upstream as of this writing, but you may be
able to work around it by downgrading VirtualBox Guest Additions to
5.2.44. To do this, create a ~/.zulip-vagrant-config file and add
this line:
VBOXADD_VERSION 5.2.44
Then run these commands (yes, reload is needed twice):
$ vagrant plugin install vagrant-vbguest
$ vagrant reload
$ vagrant reload --provision
Vagrant guest doesn’t show (zulip-server) at start of prompt
This is caused by provisioning failing to complete successfully. You
can see the errors in var/log/provision.log; it should end with
something like this:
ESC[94mZulip development environment setup succeeded!ESC[0m
The ESC stuff are the terminal color codes that make it show as a nice
blue in the terminal, which unfortunately looks ugly in the logs.
If you encounter an incomplete /var/log/provision.log file, you need to
update your environment. Re-provision your Vagrant machine; if the problem
persists, please come chat with us (see instructions above) for help.
After you provision successfully, you’ll need to exit your vagrant ssh
shell and run vagrant ssh again to get the virtualenv setup properly.
ssl read error
If you receive the following error while running vagrant up:
SSL read: error:00000000:lib(0):func(0):reason(0), errno 104
It means that either your network connection is unstable and/or very
slow. To resolve it, run vagrant up until it works (possibly on a
better network connection).
ssh connection closed by remote host
On running vagrant ssh, if you see the following error:
ssh_exchange_identification: Connection closed by remote host
It usually means the Vagrant guest is not running, which is usually
solved by rebooting the Vagrant guest via vagrant halt; vagrant up. See
Vagrant was unable to communicate with the guest machine
for more details.
Vagrant was unable to communicate with the guest machine
If you see the following error when you run vagrant up:
Timed out while waiting for the machine to boot. This means that
Vagrant was unable to communicate with the guest machine within
the configured ("config.vm.boot_timeout" value) time period.

If you look above, you should be able to see the error(s) that
Vagrant had when attempting to connect to the machine. These errors
are usually good hints as to what may be wrong.

If you're using a custom box, make sure that networking is properly
working and you're able to connect to the machine. It is a common
problem that networking isn't setup properly in these boxes.
Verify that authentication configurations are also setup properly,
as well.

If the box appears to be booting properly, you may want to increase
the timeout ("config.vm.boot_timeout") value.
This has a range of possible causes, that usually amount to a bug in
Virtualbox or Vagrant. If you see this error, you usually can fix it
by rebooting the guest via vagrant halt; vagrant up.
Vagrant up fails with subprocess.CalledProcessError
The vagrant up command basically does the following:
Downloads an Ubuntu image and starts it using a Vagrant provider.
Uses
vagrant sshto connect to that Ubuntu guest, and then runstools/provision, which has a lot of subcommands that are executed via Python’ssubprocessmodule. These errors mean that one of those subcommands failed.
To debug such errors, you can log in to the Vagrant guest machine by
running vagrant ssh, which should present you with a standard shell
prompt. You can debug interactively by using, for example,
cd zulip && ./tools/provision, and then running the individual
subcommands that failed. Once you’ve resolved the problem, you can
rerun tools/provision to proceed; the provisioning system is
designed to recover well from failures.
The Zulip provisioning system is generally highly reliable; the most common cause of issues here is a poor network connection (or one where you need a proxy to access the Internet and haven’t configured the development environment to use it).
Once you’ve provisioned successfully, you’ll get output like this:
Zulip development environment setup succeeded!
(zulip-server) vagrant@vagrant:/srv/zulip$
If the (zulip-server) part is missing, this is because your
installation failed the first time before the Zulip virtualenv was
created. You can fix this by just closing the shell and running
vagrant ssh again, or using source .venv/bin/activate.
Finally, if you encounter any issues that weren’t caused by your Internet connection, please report them! We try hard to keep Zulip development environment provisioning free of bugs.
pip install fails during vagrant up on Linux
Likely causes are:
Networking issues
Insufficient RAM. Check whether you’ve allotted at least two gigabytes of RAM, which is the minimum Zulip requires. If not, go to your VM settings and increase the RAM, then restart the VM.
Unmet dependencies error
When running vagrant up or provision, if you see the following error:
==> default: E:unmet dependencies. Try 'apt-get -f install' with no packages (or specify a solution).
It means that your local apt repository has been corrupted, which can usually be resolved by executing the command:
$ apt-get -f install
Specifying an Ubuntu mirror
Bringing up a development environment for the first time involves
downloading many packages from the Ubuntu archive. The Ubuntu cloud
images use the global mirror http://archive.ubuntu.com/ubuntu/ by
default, but you may find that you can speed up the download by using
a local mirror closer to your location. To do this, create
~/.zulip-vagrant-config and add a line like this, replacing the URL
as appropriate:
UBUNTU_MIRROR http://us.archive.ubuntu.com/ubuntu/
Specifying a proxy
If you need to use a proxy server to access the Internet, you will
need to specify the proxy settings before running vagrant up.
First, install the Vagrant plugin vagrant-proxyconf:
$ vagrant plugin install vagrant-proxyconf
Then create ~/.zulip-vagrant-config and add the following lines to
it (with the appropriate values in it for your proxy):
HTTP_PROXY http://proxy_host:port
HTTPS_PROXY http://proxy_host:port
NO_PROXY localhost,127.0.0.1,.example.com,.zulipdev.com
For proxies that require authentication, the config will be a bit more complex, for example:
HTTP_PROXY http://userName:userPassword@192.168.1.1:8080
HTTPS_PROXY http://userName:userPassword@192.168.1.1:8080
NO_PROXY localhost,127.0.0.1,.example.com,.zulipdev.com
You’ll want to double-check your work for mistakes (a common one
is using https:// when your proxy expects http://). Invalid proxy
configuration can cause confusing/weird exceptions; if you’re using a
proxy and get an error, the first thing you should investigate is
whether you entered your proxy configuration correctly.
Now run vagrant up in your terminal to install the development
server. If you ran vagrant up before and failed, you’ll need to run
vagrant destroy first to clean up the failed installation.
If you no longer want to use proxy with Vagrant, you can remove the
HTTP_PROXY and HTTPS_PROXY lines in ~/.zulip-vagrant-config and
then do a vagrant reload.
Using a different port for Vagrant
You can also change the port on the host machine that Vagrant uses by
adding to your ~/.zulip-vagrant-config file. E.g., if you set:
HOST_PORT 9971
(and vagrant reload to apply the new configuration), then you would visit
http://localhost:9971/ to connect to your development server.
If you’d like to be able to connect to your development environment from other
machines than the VM host, you can manually set the host IP address in the
~/.zulip-vagrant-config file as well. For example, if you set:
HOST_IP_ADDR 0.0.0.0
(and restart the Vagrant guest with vagrant reload), your host IP would be
0.0.0.0, a special value for the IP address that means any IP address can
connect to your development server.
Customizing CPU and RAM allocation
When running Vagrant using a VM-based provider such as VirtualBox or VMware Fusion, CPU and RAM resources must be explicitly allocated to the guest system (with Docker and other container-based Vagrant providers, explicit allocation is unnecessary and the settings described here are ignored).
Our default Vagrant settings allocate 2 CPUs with 2 GiB of memory for the guest, which is sufficient to run everything in the development environment. If your host system has more CPUs, or you have enough RAM that you’d like to allocate more than 2 GiB to the guest, you can improve performance of the Zulip development environment by allocating more resources.
To do so, create a ~/.zulip-vagrant-config file containing the
following lines:
GUEST_CPUS <number of cpus>
GUEST_MEMORY_MB <system memory (in MB)>
For example:
GUEST_CPUS 4
GUEST_MEMORY_MB 8192
would result in an allocation of 4 CPUs and 8 GiB of memory to the guest VM.
After changing the configuration, run vagrant reload to reboot the
guest VM with your new configuration.
If at any time you wish to revert back to the default settings, simply
remove the GUEST_CPUS and GUEST_MEMORY_MB lines from
~/.zulip-vagrant-config.